
'%3e%3crect opacity='0.2' width='32' height='32' fill='%2312306C'/%3e%3cpath d='M24.2885 25.0767C24.8494 24.964 25.1815 24.3707 24.8951 23.8718C24.2439 22.7376 23.2141 21.7409 21.8952 20.9822C20.2039 20.0094 18.1317 19.4821 16 19.4821C13.8683 19.4821 11.7961 20.0094 10.1049 20.9822C8.78587 21.7409 7.75609 22.7376 7.10495 23.8718C6.8185 24.3707 7.15063 24.964 7.71154 25.0767L8.68725 25.2727C13.5149 26.2424 18.4851 26.2424 23.3128 25.2727L24.2885 25.0767Z' fill='%2312306C'/%3e%3cpath d='M22.2359 12.2225C22.2359 15.659 19.444 18.4449 16 18.4449C12.556 18.4449 9.76407 15.659 9.76407 12.2225C9.76407 8.78589 12.556 6 16 6C19.444 6 22.2359 8.78589 22.2359 12.2225Z' fill='%2312306C'/%3e%3c/g%3e%3cdefs%3e%3cclipPath id='clip0_2531_12631'%3e%3crect width='32' height='32' rx='16' fill='white'/%3e%3c/clipPath%3e%3c/defs%3e%3c/svg%3e)
Kit Instructions
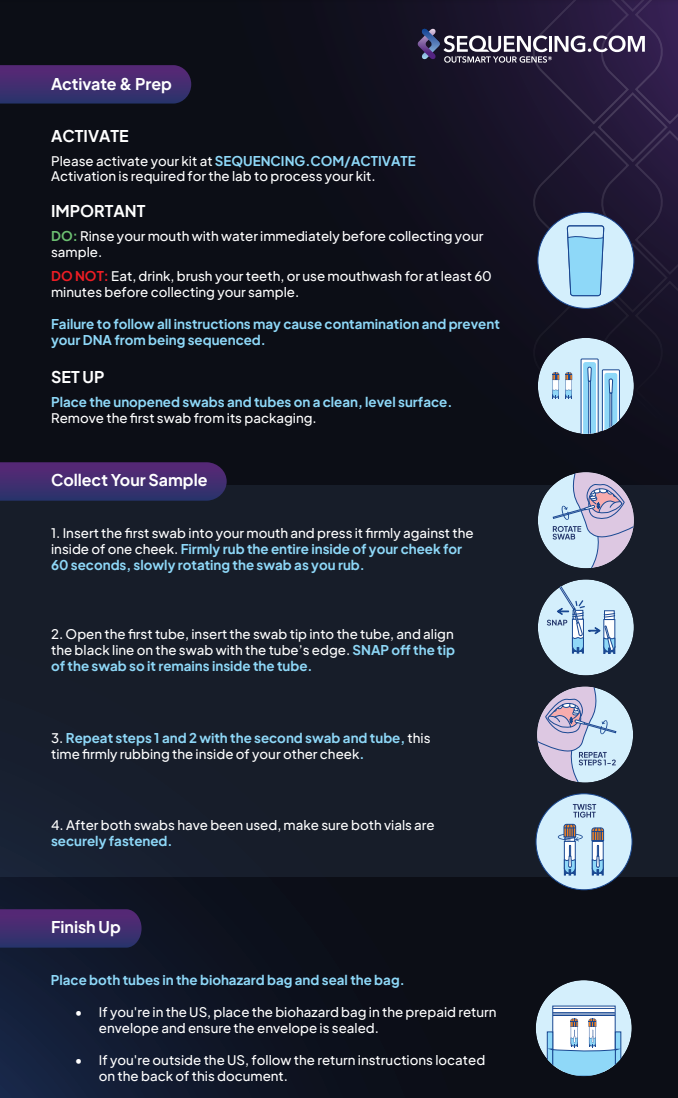
Instructions for Activating And Using Your Sequencing DNA Collection Kit
Inside of your kit, you will find a printed set of instructions to guide you through the process. Plus, there's a QR code on the inside of the lid that will take you directly to the Activation Page, super easy and convenient!
Important Reminder: Be sure to activate your kit before sending it back to the lab. Activation is crucial, if the kit isn’t activated, the lab won’t be able to begin the sequencing process. And we want to get started on your results as soon as possible!
Important!
Do Not:
-
Eat, drink (other than water), smoke, brush your teeth, or use mouthwash for at least 1 hour before using the swab.
Do:
-
Wash your mouth with water immediately before using the swab. Swish water around in your mouth and spit it out to help clean your mouth.
-
Make sure to press the swab firmly on the inside of your cheek, avoiding the gums or tongue, and move it around your cheek.
-
Swab each cheek for at least 60 seconds to collect a sufficient sample.
Activating your Kit
-
Activate your kit:
- Go to sequencing.com/activate to activate your kit. Activation is required for the lab to process your sample.
- Go to sequencing.com/activate to activate your kit. Activation is required for the lab to process your sample.
Collecting Your Sample
-
Set up:
- Place the unopened swabs and tubes on a clean, level surface.
- Remove the first swab from its packaging.
- Ensure that your Kit ID number matches the identification number on the vial. If the numbers do not match or there is no kit ID on tube, contact support at support@sequencing.com.
-
Swabbing:
- Insert the first swab into your mouth and press it firmly against the inside of one cheek.
- Firmly rub the entire inside of your cheek for 60 seconds, slowly rotating the swab as you rub.
-
Insert the swab into the tube:
- Open the first tube and insert the swab tip into the tube.
- Align the black line on the swab with the tube's edge. SNAP off the tip of the swab so it remains inside the tube.
- Secure the tube with the orange cap.
-
Repeat the process:
- Repeat steps 2 and 3 with the second swab and tube, this time firmly rubbing the inside of your other cheek.
- Repeat steps 2 and 3 with the second swab and tube, this time firmly rubbing the inside of your other cheek.
-
Secure the tubes:
- After both swabs have been used, make sure both tubes are securely fastened.
- After both swabs have been used, make sure both tubes are securely fastened.
-
Packing the tube:
- Place both tubes in the biohazard bag and seal the bag.
- Place both tubes in the biohazard bag and seal the bag.
-
Returning your kit:
- If you are in the US, place the biohazard bag in the prepaid return envelope and ensure the envelope is sealed.
- If you are outside the US, follow the return instructions located on the back of the document.
Assistance
If you have any questions or issues through this process please reach out to support@sequencing.com. We are here to help!